How Do I...? A M.U.G.E.N primer
Tutorial Part 2 - Collision boxes
M.U.G.E.N, Elecbyte (c)1999-2009
Updated 17 September 2009
Tutorial 1 | 2 |
3 | 4
Introduction
In this part, we will talk about how to define collision boxes for the
animations in your character's .air file. The documentation for .air files
is in air.html. It's a good idea to read it before
proceeding with this tutorial.
1. About Collision Boxes
Once you have put together an animation for the character, you can
use AirEditor to define collision boxes. There are two kinds of collision
boxes:
- Clsn1 - Attack box (red in color)
- Clsn2 - Hit box (blue in color)
Simply put, if one of Player 1's attack boxes overlaps any one of Player 2's hit boxes,
then it means Player 1 has hit Player 2.
2. Using AirEditor
AirEditor is a developer tool, and can be found in the old_tools/ directory
of your M.U.G.E.N installation.
The instructions for using AirEditor
are in airedit.txt. When you are ready, run the airedit executable.
Go to File -> Open and choose the sff file you want to load, followed by the
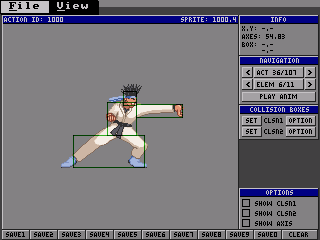
accompanying air file. You will now see your character on the screen:
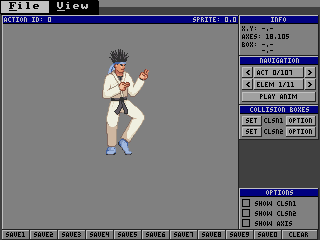
Let's explain what you see on the screen.
- The big window that you see your character displayed in is called the
Display window. The title area shows the current animation action
you are looking at, as well as the sprite number of the sprite shown.
- The Info window at the upper-left shows:
- X,Y coordinates of the cursor, which is displayed as a crosshair in the
display window
- X,Y position of the axis of the sprite, relative to the upper-left corner
of the sprite. This is the number you entered in the player-sff.def file used to
generate the SFF
- Coordinates of the two opposing corners of the box you create when you
drag the cursor on the display window
- The Navigation window:
- Current action being displayed. You can scroll through the animation
actions in your .air file by pressing the arrow buttons on either side,
or you can enter it manually by clicking on the middle button
- Current element of the action that is being shown. You can scroll through
the available elements, or manually enter it, just like the action
- Click "Play Anim" to preview the animation
- The Collision boxes window:
- There are buttons here to let you set the bounding boxes for the current
animation element
- The Options window:
- A toggle button to enable/disable display of the Clsn1 (attack) box
- A toggle button to enable/disable display of the Clsn2 (hit) box
- A toggle button to enable/disable display of the sprite's axis
- The wide grey box at the very top of the screen beside the menu is the
Status bar, which shows you some information, such as your last
menu action.
- At the bottom of the screen you see a row of Save boxes. Each of these
represents a slot that you can save a box into. The clear button
erases them all.
To define a collision box, simply drag the mouse cursor over the region
you want to create a box at. This will be displayed as a bright green box.
Click without dragging to make the green box go away. Let's start by defining
boxes for KFM's standing frame. First, we'll drag a box to represent his
body.
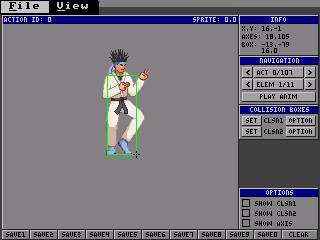
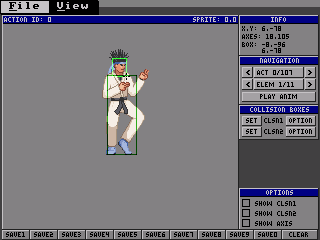
Click on the Save1 button at the bottom of the screen to save that box
to memory. Now drag a second box for the head and click on Save2 to save that.
Notice how the saved boxes appear in a darker color.
If you want to go back and correct one of the saved boxes, simply drag a
new green box.
Next, you assign the set of boxes to the current animation element.
Click on the corresponding "Set" box in the Collision boxes menu.
Repeat the procedure for all the elements in the animation action.
When you are done with your changes, remember to save your .air file.
Click on the File menu and choose Save.
3. General Tips
- You can quickly load your character by specifying the .sff and the
.air filenames at the prompt. For example,
airedit chars/kfm/kfm.sff chars/kfm/kfm.air
- If you have a lot of frames using the same set of boxes, you can
scroll through each element, saving the boxes to the .air file
without clearing the boxes each time.
Alternatively, you can set the collision box as "Default" to define
a default set of boxes for each frame within an action. Click on
the "Options"
Read air.html for more information on default collision boxes.
- In common cases, try to keep Clsn2 boxes within your Clsn1 boxes.
The reason for this is so that it becomes possible to trade hits
between players. If you have a Clsn1 box without a Clsn2 box in
it, then setting priorities on attacks becomes meaningless, as the
attacks would have infinite priority that way.
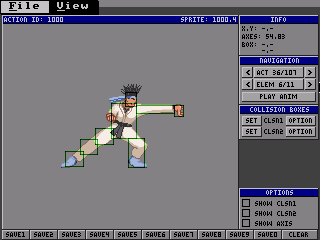
- Don't be too detailed with your collision boxes. The point is not to
make a pixel-accurate representation of the character, but to make
one that is game-friendly. For example, boxes for your character
on the ground should have Clsn2 boxes that span the space between
both legs. In this case, too much detail is actually undesirable.
Here is a picture of a one that is too detailed. You want to avoid this.
This next one has a better set. Not only does it take less effort to create,
but it better approximates the movement of the character over time. Also,
there is less chance that a Clsn1 box from an attack would slip through
a gap.
Tutorial 1 | 2 |
3 | 4
Next is Tutorial Part 3


